COM switch is an adapter for switching a distant relay over Ethernet cable, using the spare pairs,
being controlled from the host computer using a spare COM port. A combination of an enhanced
Remote Reset and Relay Powerstrip
projects, with some bits added.
A commercial product from the vaguely similar class is eg.
DSR4-RPC, Remote Power Control
and Console Access.
In a warehouse in a kingdom far far away, there was a rack full of network switches. The power feed was worse than lousy, and the blackouts often ended with too slow return to normal voltage, leaving the electronics of the switches confused and deadlocked. The on-site technicians then had to come and power-cycle the boxes. The annoyance was not big nor often enough to warrant an UPS for the rack, but there was still a desire to do something.
So the COMswitch was created.
There is a computer there, on n UPS. This one is always on, and guaranteed to return back even after it gets off. It was selected as a control machine. On its COM port there is a device, connected to the LAN cable through a device equivalent to a Power-over-Ethernet power injector. The cable ends in the rack, where there is another such device, connected to the power strip from which the switches are powered. There is a relay in the power strip, normally closed. When its coil gets energized, the relay interrupts the power into the power strip, allowing power-cycling of all the devices on it.
The device has three parts: COM device, powerstrip switch, and PoE injectors.
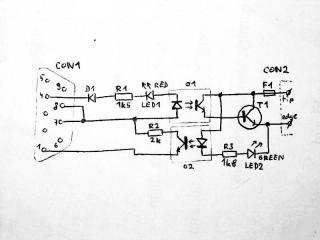
The device contains a transistor, controlled via an optron.
Like the Remote Reset (see the discussion there), the optron
is connected between DTR and RTS, and switched on when DTR=0 and RTS=1, to avoid spurious
switching during PnP device autodetection. There is also another optron, sensing presence of voltage
over the transistor, indicating the presence of power and the loop integrity. Click on the schematics
to see it in full size.
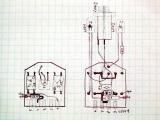
Physical assembly is realized with a small piece of a breadboard. The optrons O1 and O2 and the transistor are located on it, together with T1.
CON2 had too long soldering "paws", they had to be cut to about 2-3mm length to fit against the board.
O1 serves to control T1. R1 limits the current through O1 and LED1. LED1 lights up red when T1 is ordered to switch. D1 serves to protect LED1 and O1 against the reverse voltage between DTR and RTS, which can be up to 30V (though usually does not exceed 24V); but better be safe.
The circuit is built into a plastic case of the Canon9 connector (see image A1). The "cable" end of the case has to be filed to accommodate the CON2 connector (see image A2). Drill 3mm holes for the LEDs (A3). If you are using metalized case, remove the metalization from the areas in the vicinity of the connector and the sides of the circuitboard (A4, A5).
When inactive, the DTR and RTS should be at 0. This way we don't drain any power from the port, and because we won't be reading any signals, the absence of power for loop power indication optron (O2) does not matter. When switched off, the DTR and RTS should be at 1. This causes CTS go to H as well (as RTS and CTS are connected because of diagnostics of presence of the adapter), and O1 to stay closed. When there is power at the CON2 and T1 is closed, LED2 should shine, O2 should be open, and thus DCD (pin 1) should be at 1. When we want to switch T1 on, we lower DTR to 0, so O1 opens and LED1 shines up, which causes the voltage over T1 to drop and O2 to close, LED2 to go dark, and DCD to go to 0. If DCD does not respond with 0 to 0 on DTR, O1 or T1 is broken. If there is 0 on DCD even if DTR and RTS are both 1, the loop between the power strip and T1 is open, or there is a power blackout on the power strip side.
| R1 | resistor 1.5 kΩ |
| R2 | resistor 2 kΩ, SMD |
| R3 | resistor 1.8 kΩ |
| D1 | diode 1N4148 |
| T1 | transistor BC337 |
| O1,O2 | optron PC817 |
| F1 | fuse Polyswitch, 250 mA (or what the application requires and T1 can handle) |
| LED1 | 3mm red LED |
| LED2 | 3mm green LED |
| CON1 | connector Canon 9 female |
| CON2 | connector power 5/2.1 mm for panel |
| - | Canon-9 connector casing |
The parts values are not critical. If your COM port gives too low output voltage to
open the O1, decrease the value of R1 (which should be low enough as it is). R2 could
be removed altogether, is there for the warm fuzzy feeling we are protecting the
O2. F1 can be omitted, but then T1 won't like you if you switch it on without load
(F1 is there mainly to protect the users from themselves (and me from the service trips),
reversible Polyswitch
one was selected in order to save space and fuses). LED1 and LED2 can be omitted if you do not
want to have a status indicator (you can then increase the R1 and R3 a bit), you can also omit
O2 (and R2 and R3 and LED2) if you don't want to have link integrity check. D1 can be any
diode. T1 can be any NPN transistor that can carry enough current to switch whatever we
have on the other side of the circuit. R3 is calculated for the circuit with 12V relay,
has to be increased if 24V is used. Surge protection of T1 with a transil or a neon bulb
is optional, suggested to be considered for long cable runs. O1 and O2 can be more or less
any cheap optron.
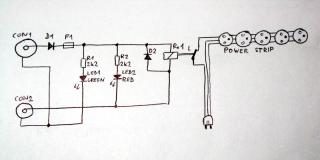
The device is a power strip with 5 mains plugs, a relay built in, and two LEDs indicating the function.
| R1,R2 | resistor 2.2 kΩ |
| D1 | diode 1N4007 |
| D2 | diode 1N4148 |
| Re1 | 12V DC relay with one DPST contact for 220V AC at 16 amp |
| LED1 | 5mm green LED |
| LED2 | 5mm red LED |
| CON1,CON2 | power connector |
| F1 | fuse Polyswitch |
| Tr1 | power supply 220V/12V DC, 300 mA (plugs to CON1, not on the schematics) |
| - | Power strip |
The parts values are not critical. The role of D1 is to protect the circuit against polarity reversal of the power supply, and against users mistaking CON1 with CON2 (yes, the connectors should be different, you may like to do it in your version); it should be sized for at least an amp of current to be on the safe end of the specs. D2 eats the voltage spike induced when Re1 switches. Re1 controls one DPST switch, which is connected to the live wire of the mains circuit, and interrupts it when Re1 is energized, switching off all the equipment connected to the power strip (which we want in order to power-cycle it; modification for switching on instead of off is possible too). R1 and R2 are resistors for limiting current through the indication LEDs. LED1 is green and indicates the presence of power in the circuit. LED2 is red and lights up when Re1 switches. (It is possible to adjust the value of R2 to make the LED2 faintly glow even when Re1 is off, as an indication of the loop integrity. The accurate value of R2 for this function will depend on the LED2, the coil of Re1, and the exact values of the O2, R3, and LED2 from the COM adapter, so you will have to experiment. The function of the loop integrity check won't be compromised by wrong values, as even with LED2 disconnected you still have the coil of Re1 in the circuit.) F1 acts as short circuit protection; with long cables and a building full of initiative people, it's better to be on the safe end - it's well-worth the sub-dollar additional price.
You can omit R1, R2, LED1, and LED2 if you do not want indication, and D1 if you are rock-solid sure nobody will connect it the wrong way (hint: shit happens, so keep D1 there, D2 will be thankful). You can also omit F1, if you are willing to take the risk, or Tr1 is not capable of supplying enough current to cause any harm or overheat itself when shorted.
Important: Pick up a relay with bigger distance between the mains part and the coil (some relays have the center pin of the switch in the middle of the coil pins, try to avoid these). You may use a smaller model than 16 amps, but it is better to have some reserve for unexpected conditions (users are dumb), so make something else than your relay the weakest spot with lowest current rating (if possible the circuit breakers).
Tr1, the power supply for the whole system, should be connected to the same power source as the power strip (but not into the power strip itself, as it would disconnect itself when switching on, leading to lots of buzzing and sparking and EM noise and load at the other equipment connected); that way the computer will know by the state of the DCD signal (see the COM Device) if the rack has power.
The crucial part for mechanical assembly is the body of the power strip. The exact kind you will get will depend on your store; even with the current degree of globalization there still is not a monopoly vendor there. (Just wait, though.) It is critical that CON1, CON2, LED1, LED2, and Re1 can fit in; pick the kind with a lot of space at the cable end (or use the kind with a built-in switch and remove the switch). See image B1. Disassemble the casing (B2). (At this moment you find you bought a power strip that is intentionally designed to not be opened, so you have to whip up your trusty Dremel and cut ugly grooves in the screws' heads, and, coincidentally, into the plastic case. When the Revolution comes, the street lamps will be decorated with hanging bodies of the so-called designers who used to insist on using screws with non-standard heads; these bastards are not worth the bullet. But I digress.) Drill the holes for the connectors and LEDs, in a way to make the connectors fit inside without getting close to the bare high-voltage parts (B3). Put the LED mounting rings in place (B4). Put in the CON1 and CON2, make sure Re1 fits (B5, B6). Wire in the parts; the outer rings of both connectors are interconnected, they are the negative side; the centers are positive (keep this in mind). Connect D2 across the coil pins of the relay. Connect D1 on the CON1 center pin, connect the R1, R2, and Re1/D2 to it. Connect the other end of Re1/D2 assembly to the center pin of CON2. Wire the LEDs and R1/R2 according to the schematics. Cut the mains wire (take care it is the live one, which is usually brown and is marked "L"), connect it to the contacts of the relay, solder and insulate the pins properly - you do not want them to come loose and bring 220V to the low-voltage part of the device (B7). Use shrinking plastic tube, or at least secure the tube in place with a drop of hot glue. Fix the relay to the power strip casing by a suitable way (I used hot glue). Make sure everything is OK. Repeat the check again, this time more thoroughly. Check the low-voltage part that it works (connect Tr1 to CON1, short CON2, the relay should click). Assemble the casing together (B8). Say a short prayer to Saint Leibowitz. You're done.
The communication between the power strip and the COM device happens over two unused pairs of the CAT5 cable. The approach was inspired by the Power-over-Ethernet (also known as IEEE802.3ae) standard.
Ethernet in the 10BaseT and 100BaseT uses two twisted-pairs for communication, the CAT5 cable usually used for structured cabling in buildings has 4 pairs. Two pairs are unused. According to the specifications, the communication pairs are orange and green, and the unused ones are blue and brown.
The order and function of the wires in the connector (see image CI1, see also
here) is:
| # | wire color | signal | power |
| 1 | orange-white | Tx+ | |
| 2 | orange | Tx- | |
| 3 | green-white | Rx+ | |
| 4 | blue | POWER- | |
| 5 | blue-white | POWER- | |
| 6 | green | Rx- | |
| 7 | brown-white | POWER+ | |
| 8 | brown | POWER+ |
Power specs borrowed from http://users.rcn.com/paul.zim/poe/.
In PoE terminology, injector is the part to which the power supply is connected, which injects the power into the cable, and splitter is the part which splits the data and power, feeding the appliance. PoE spec uses 48 volts power and DC-DC convertors down to 5 or 12V on the appliance side (because of the 0.5 amp load limit of the CAT5 cable), but many systems, often homegrown, use 12V instead.
The pins 4, 5, 7, and 8 are often not connected at all in many switches and network cards, bringing low-voltage power on them accidentally won't cause problems. If you are not certain about your equipment, and can not make sure by looking at the boards, be preventively careful about not connecting the power-carrying cable to the network interfaces.
For our purposes, we call the device on the powerstrip end "injector", as the power supply is located there, and the COM device end is named "splitter".
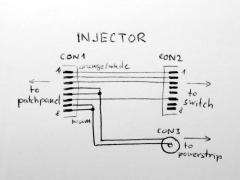
The injector's role is to bring the power to the brown pair (pins 7,8) and the ground to the blue pair (pins 4,5).
Because of the network architecture at its location, a simple assembly was chosen: a CAT5 patch cable was assembled, then its insulation was longitudally cut on one side, the brown and blue pairs were extracted and cut, their strands were twisted together (blue-bluewhite and brown-brownwhite), and a 2-strands cable with the connector at its end was soldered to their ends (see image CI2 for detail). The joint (CI3) is then wrapped in electrical tape, for electrical and mechanical protection (CI4).
| CON1,CON2 | connector RJ45 for cable |
| CON3 | connector power 5/2.1 mm for cable |
| - | a piece of CAT5 cable |
| - | a piece of 2-strands cable |
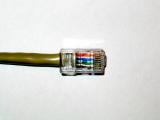 CI1, RJ 45 connector wiring, detail | 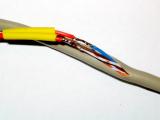 CI2, Injector, wire split detail | 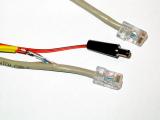 CI3, Injector, final assembly, naked | 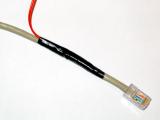 CI4, Injector, final assembly |
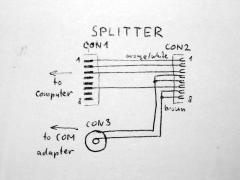
The splitter's role is to extract the power lines from the network cable, and feed the data lines to the computer and the power lines to the COM adapter.
Because I didn't remember how long cable is needed for connecting the server to the wall socket, a more complicated assembly was chosen. A RJ45 female plug (CON2) was soldered to a breadboard (there are no wire-mountable ones available on the market as far as I can see), and a short cable with an RJ45 plug (CON1) was soldered to its terminals, omitting the blue and brown pairs. Another short cable, with the power connector (CON3) on its end, was soldered to the pins 4-5 (positive end, center hole of the connector) and 7-8 (negative end, the rim of the connector). See the images CS1-2. The network and power cables are fixed to the board with pairs of clamps made from thick brass wire (images CS3,4). The final assembly (CS5) is wrapped in electrical tape for mechanical and electrical protection (CS6). Putting the device into a box would be better, but I didn't have a suitable box.
| CON1 | connector RJ45 for cable |
| CON2 | connector RJ45 for a circuitboard |
| CON3 | connector power 5/2.1 mm for cable |
| - | a piece of CAT5 cable |
| - | a piece of 2-strands cable |
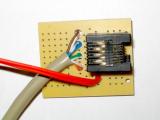 CS1, Splitter detail | 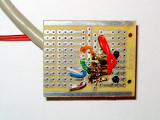 CS2, Splitter detail, bottom | 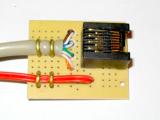 CS3, Splitter detail with wires fixed | 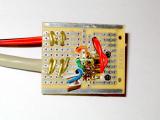 CS4, Splitter detail with wires fixed, bottom |
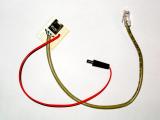 CS5, Splitter, final assembly, naked | 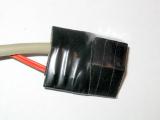 CS6, Splitter, final assembly |
The software is a simple program for setting the control lines and reading other control lines and evaluating their combinations for error conditions.
Usage: comswitch /dev/ttySx [-q] [-f] [n]where /dev/ttySx is the serial port device
Device on port COM1 (/dev/ttyS0), loop check only:
comswitch /dev/ttyS0
Device on port COM2 (/dev/ttyS1), switch for 5 seconds:
comswitch /dev/ttyS1 -s 50
Device on port COM2 (/dev/ttyS1), switch for 1.5 seconds, force through errors:
comswitch /dev/ttyS1 -s 15 -f
Returns error code 0 when all went OK, sends an error to stderr and ends with a nonzero error code when something failed. Most important codes are code 1 (no power detected on loop) and 2 (no adapter detected).
See software for the Remote Reset project.
comswitch.c - source code (compile with the command
cc -o comswitch comswitch.c
comswitch - compiled binary for Linux